
Introduction
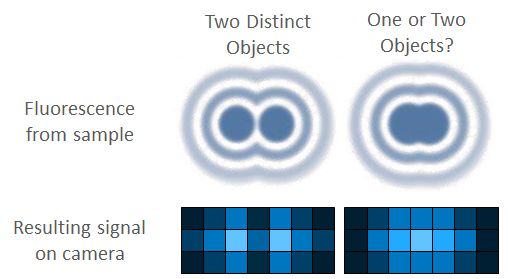
In imaging, the resolution is defined as the shortest distance between two points on a specimen that can still be distinguished. This means that if a camera has a resolution of 1 µm, it can resolve objects in the sample that are more than 1 µm apart. But if objects are closer than 1 µm the imaging system will be unable to tell them apart, and they will appear as one object. This is why higher resolutions (down to the nanometer scale) are important when working with smaller samples, in order to resolve the fine details.
There are multiple different factors within an imaging system that affect the maximum resolution, most importantly the microscope resolution and the camera resolution. This article will focus on camera resolution, but aspects from the microscope will also be mentioned as the two both have a big impact on the final maximum resolution of any imaging system.
Camera Resolution
The camera resolution depends on two main factors: the sensor pixel size, and the total magnification. Smaller camera pixels and greater magnifications lead to higher resolutions, but the former comes at the cost of sensitivity (larger pixels are more sensitive) and the latter comes at the cost of field of view (higher magnifications decrease the imaging area). The effect of magnification on pixel size is outlined on Figure 2.
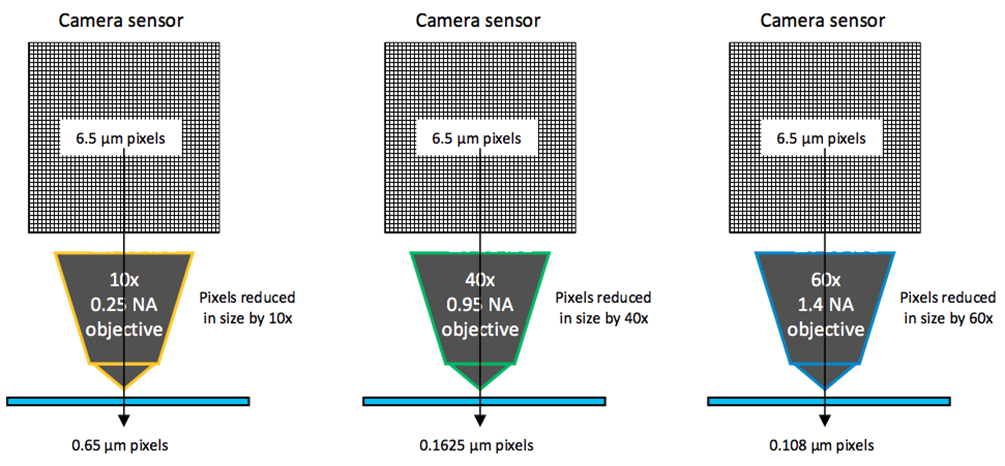
The microscope objective decreases the pixel in size, relative to the magnification. This means that when using a 6.5 um pixel camera with a 60x objective, the pixel size at the sample is in fact 6.5/60 = 0.108 um or 108 nm, resulting in a very high resolution.
Diffraction Limit Of Light
However, when resolution starts to reach this nanometer scale there are different challenges to consider, namely the diffraction limit of light. Due to the way that light diffracts (spreads out) between the sample and the camera, there is a hard limit on the resolution of around 200 nm (depending on the wavelength of light used, for typical green fluorescence the limit is ~220 nm). Trying to image below 200 nm requires specialist techniques known as super-resolution techniques, which are described in more detail in other articles.
Due to this diffraction limit, it is common practice in standard fluorescence microscopy to use an imaging setup capable of reaching the lower limit of ~200 nm to detect the smallest resolvable object. Attempting to resolve any lower than this won’t be possible with standard microscopy, so this is the optimum level of resolution.
Nyquist Sampling
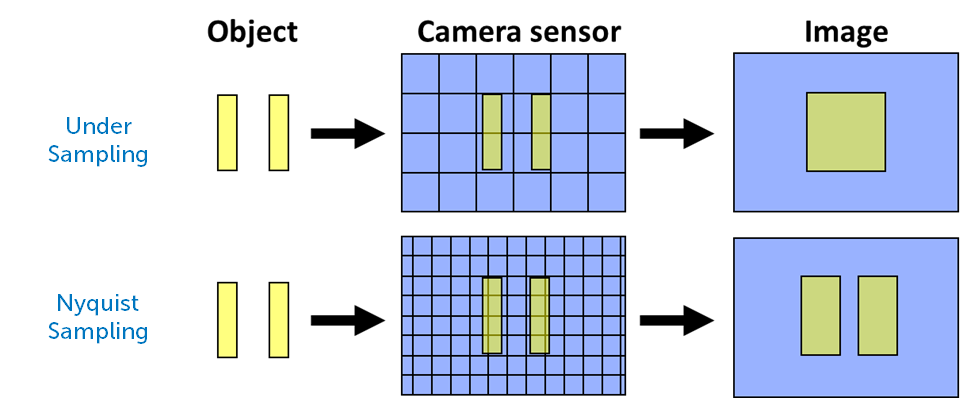
Another factor that affects camera resolution is known as Nyquist sampling, named after Swedish engineer Harry Nyquist. Essentially, imaging systems often match resolution to the size of a single pixel. If two objects are next to each other, so are the pixels, as seen in Fig.1. This makes resolving these objects as separate much harder.
In order to best separate adjacent features in a sample, there should be at least one pixel between them. This means that the best resolutions require matching to two camera pixels instead of one. This means that the sampling rate is doubled, as there are twice the number of pixels and more fine details can be resolved. This doubled sampling rate is known as Nyquist sampling, and states that your max resolution should be twice as high as the smallest opject in your sample.
Operating below Nyquist sampling is known as undersampling, and operating above it is oversampling. Generally, it is best to image when optimised for Nyquist. Luckily, camera companies realise that most researchers image using standard magnifications: 20x, 40x, 60x and 100x are typically used within life sciences. One of the reasons that camera pixel sizes are so specific is that they match up to certain magnifications:
- Imaging at 20x or 40x matches to a ~4 µm pixel (~100 nm at 40x)
- Imaging at 60x matches to a 6.5 µm pixel (108 nm at 60x)
- Imaging at 100x matches to a 11 µm pixel (110 nm at 100x)
So if you typically use a 60x magnification to best capture your samples, in order to get the best resolution this should be matched with a camera that features 6.5 µm pixels. This combination will be optimised for Nyquist and be able to resolve fine details.
Bear in mind that some imaging systems use additional optics and lenses, perhaps in the mount where the camera attaches to the microscope. Your image quality will only be as good as your worst lens, and the resolution of your system is limited by the worst component. Resolution should be matched between camera and microscope to get close to Nyquist.
Summary
In order to image fine details within small samples, resolution is a vital component. Cameras need to match resolution with microscopes, so bear in mind what magnification you typically image at and find a camera with a pixel size to match. This will allow even the smallest details in your sample to be revealed, but bear in mind the difficulties in imaging below ~200 nm due to the diffraction limit of light.